Step-by-Step Packaging of an App Only Few Know How to: Arduino IDE 2.3.2
It has come to our attention that many packagers have experienced issues with packaging Arduino IDE 2 so it can be deployed in an enterprise environment. To help the application packaging community learn how we package these complex (read: poorly packaged by vendor) applications we documented a step-by-step guide.
We’re working on new self-paced courses and to test how good they are we gave to test it to our new intern Signe. She knew nothing about app packaging. All she had was course recordings, Master Packager Pro, our guidance and app to package. A hard one. Perhaps too hard. However, this is all you need. This is what we want to show. The next guide is created by Signe and proofread/checked by Toms and Edijs. Enjoy and become a Master Packager faster.
Application name: Arduino IDE 2.3.2
Link to Arduino IDE MSI installer: https://www.arduino.cc/en/software
Tools needed: Master Packager Pro (or any other repackaging software)
We are following our designed Master Packager Framework that helps to package any application in a fast and high-quality way.
What we will show in this guide:
- Evaluation process - Installing vendor MSI and monitoring installation process.
- Summarizing problems - issues wrong with this application and its installer.
- Packaging process - how to resolve these problems using Master Packager software.
- Wrapping - how to create a PSAppDeployToolkit (PSADT) wrappers using Master Wrapper.
- Testing - testing package using system account.
Evaluation
- Open a clean virtual machine
- Open Master Packager Toolbox
- Install the Arduino IDE MSI on the virtual machine
- After installation, check what apps were installed and the location of the installed files by using Master Packager Toolbox
- Open the application to verify if there is any configuration that should be included in our package
To see where the application is installed refresh Master Packager Toolbox by Right-Click -> Refresh or pressing F5. Everything that was installed will be marked green. Everything that will be uninstalled will be marked red. This is excellent when doing app evaluation and testing.
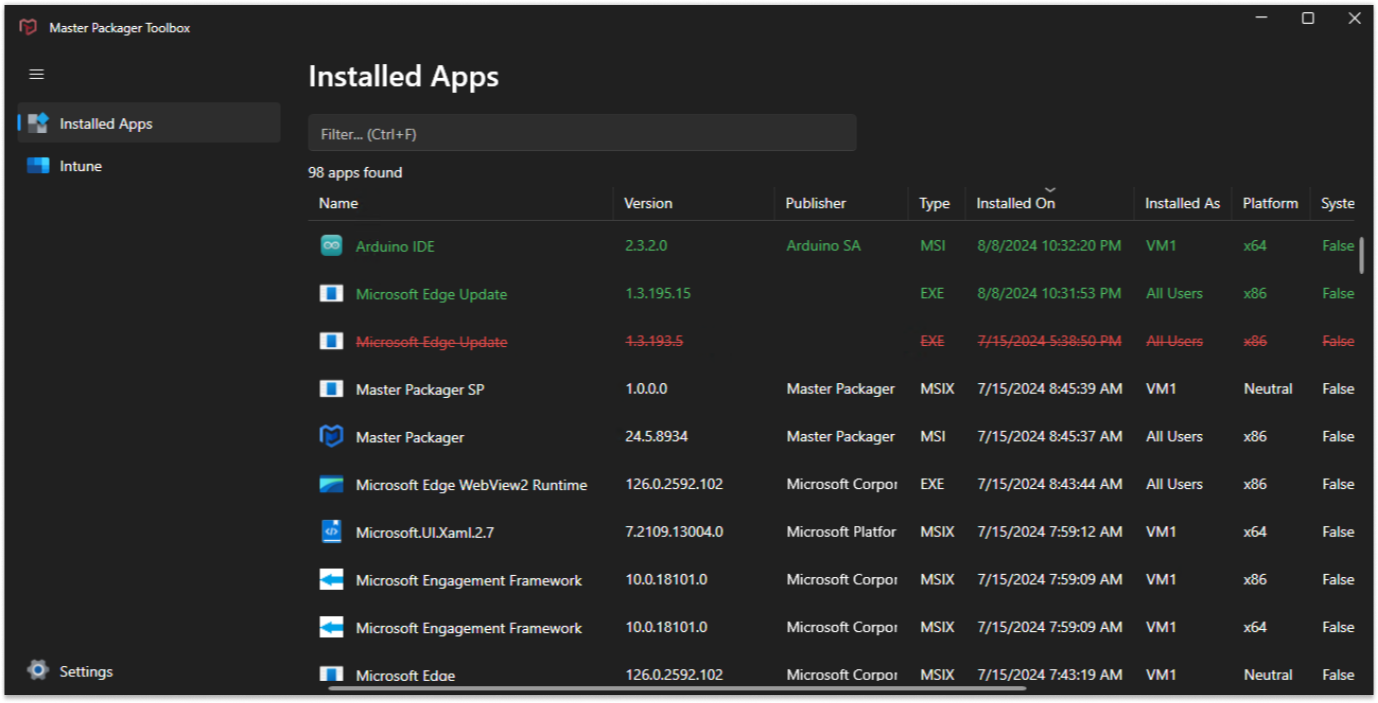
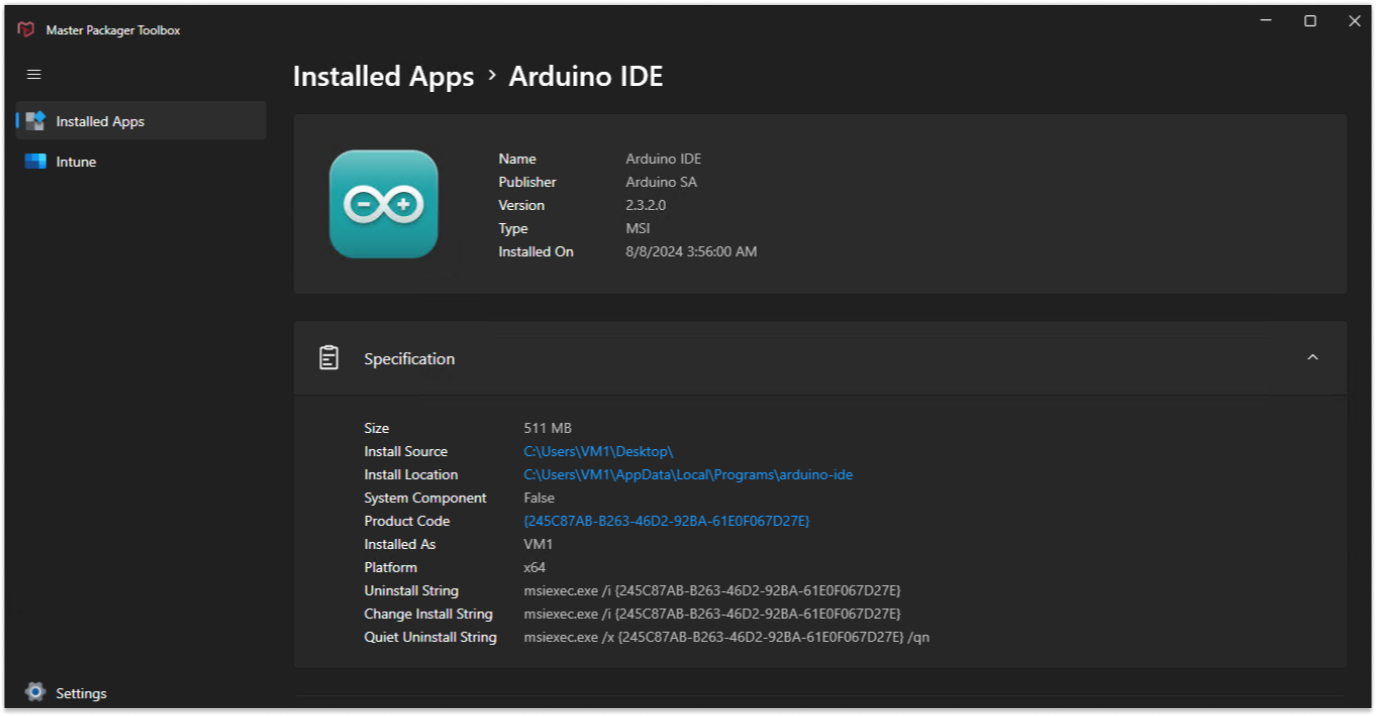
Click on the Arduino IDE app row to see more details about it.
Problems
After evaluation of the installation, there are few problems that we encountered:
-
MSI creates desktop shortcut by default. The desktop is a user’s private space and in an enterprise deployment scenario desktop shortcuts should be removed.
-
MSI installs files in a per user location. Enterprises want per-machine apps. Main reasons are better security and ease of deployment when apps are per-machine.
-
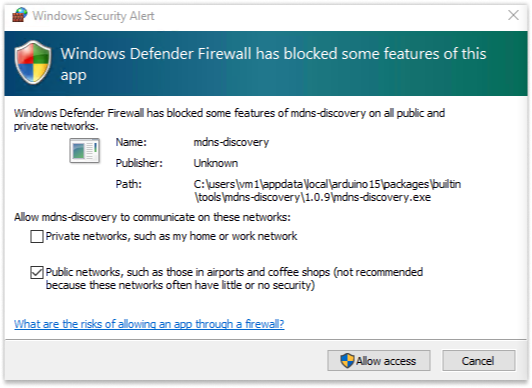
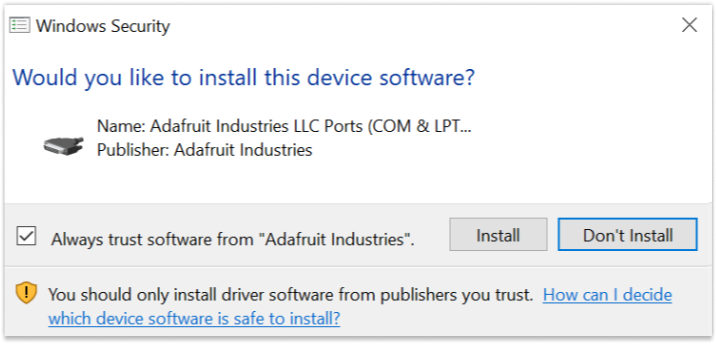
Windows Defender Firewall displays two Windows Security Alerts when a user runs the application:
- Arduino IDE
- Mdns-discovery
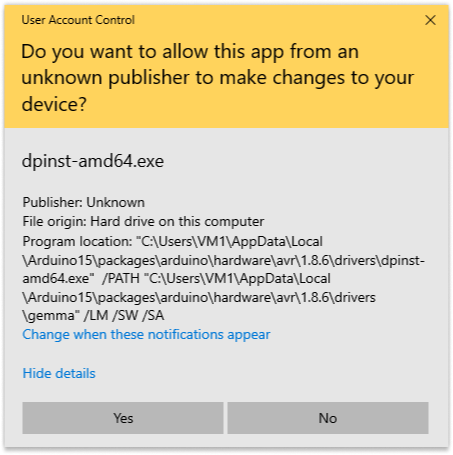
- App requires the installation of several drivers, which also needs admin rights.
5. During first launch the application downloads libraries.
In an enterprise environment users do not have admin rights. At least they shouldn’t.
As you saw from firewall exception and driver installation popups they point to a per-user location – application checks if the library files are present in “%localappdata%\arduino15” location.
Although the software is free to download it costs money. It costs time and money for every company in world to package it or better -> re-doing the installer with hacks and tricks as you will see next.
It’s clear that this application was created without considering enterprise requirements.
Packaging
Now let’s resolve these problems one by one.
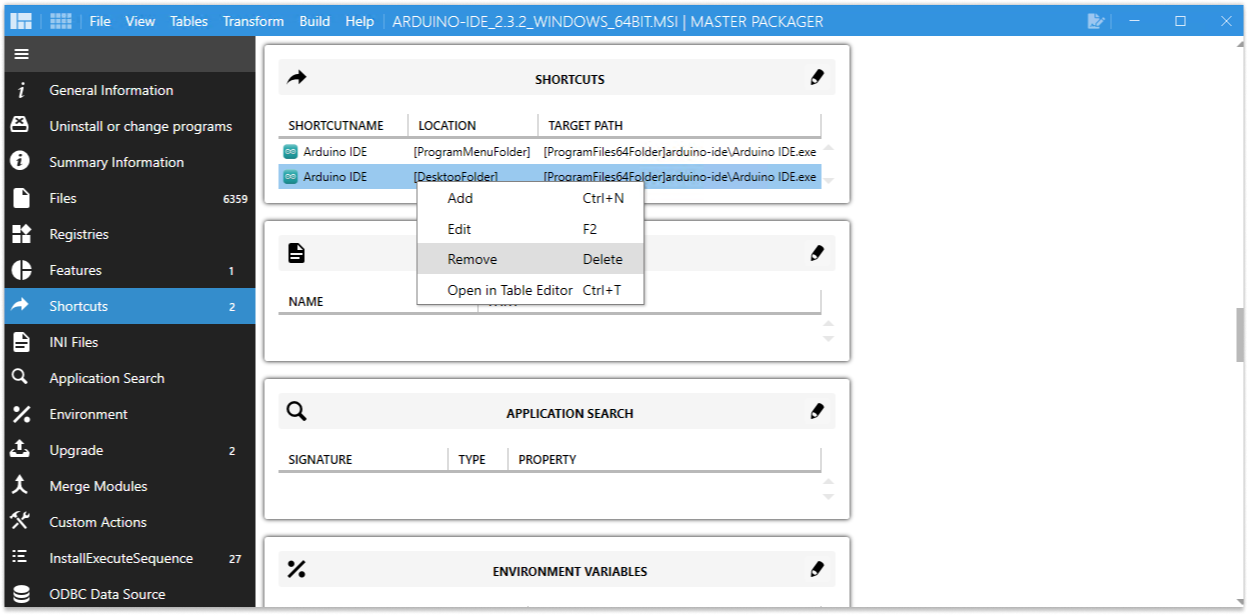
Removing Desktop shortcut
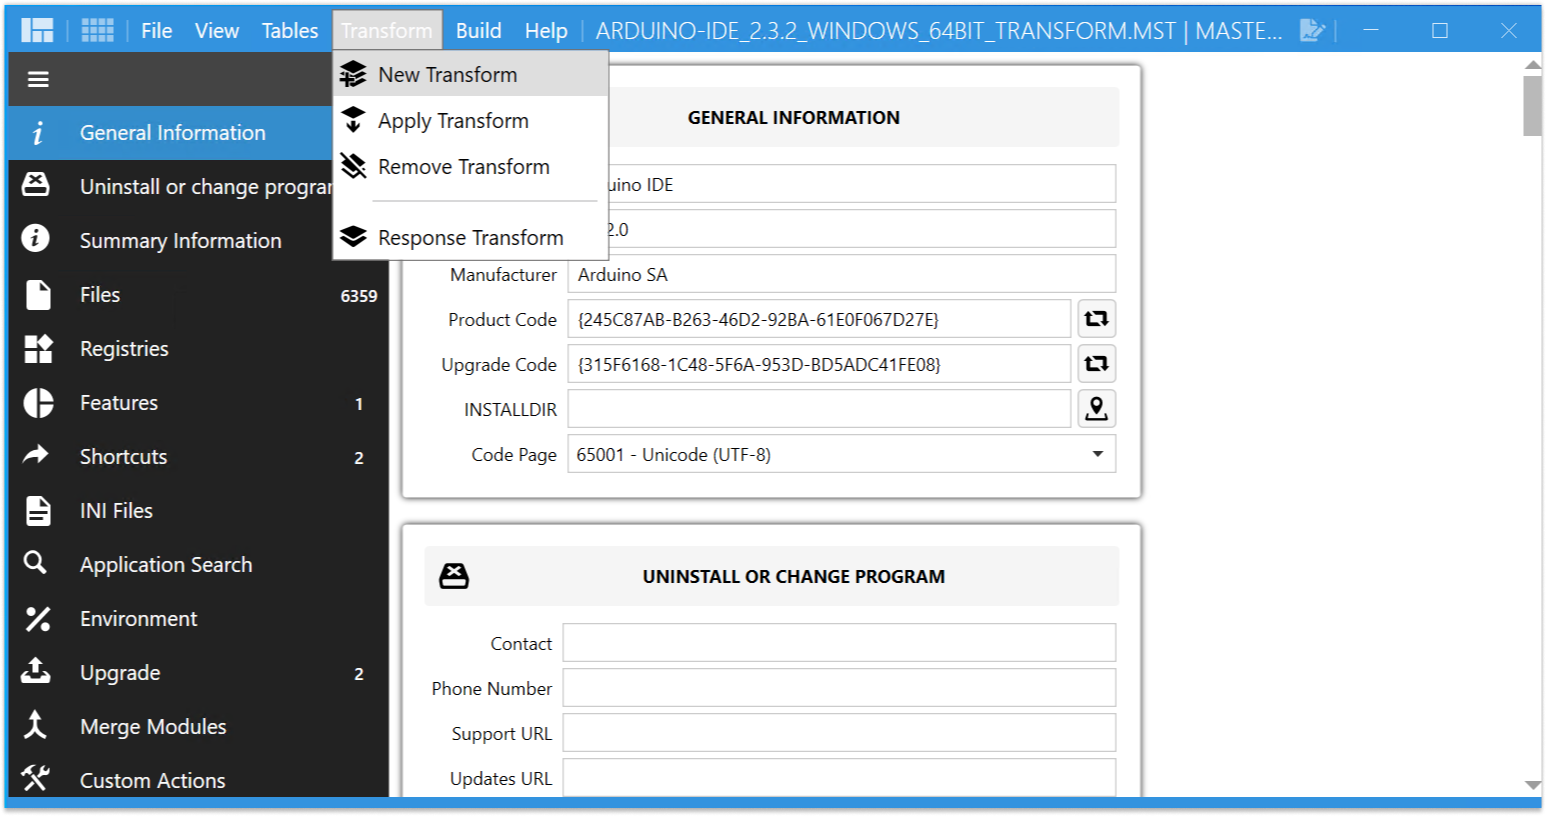
Open the MSI using Master Packager and create a new Transform (MST) file. It is recommended to create MST file for every vendor MSI you want to package (modify) and deploy.
Under the shortcuts section, select desktop shortcut, right click on it and remove it.
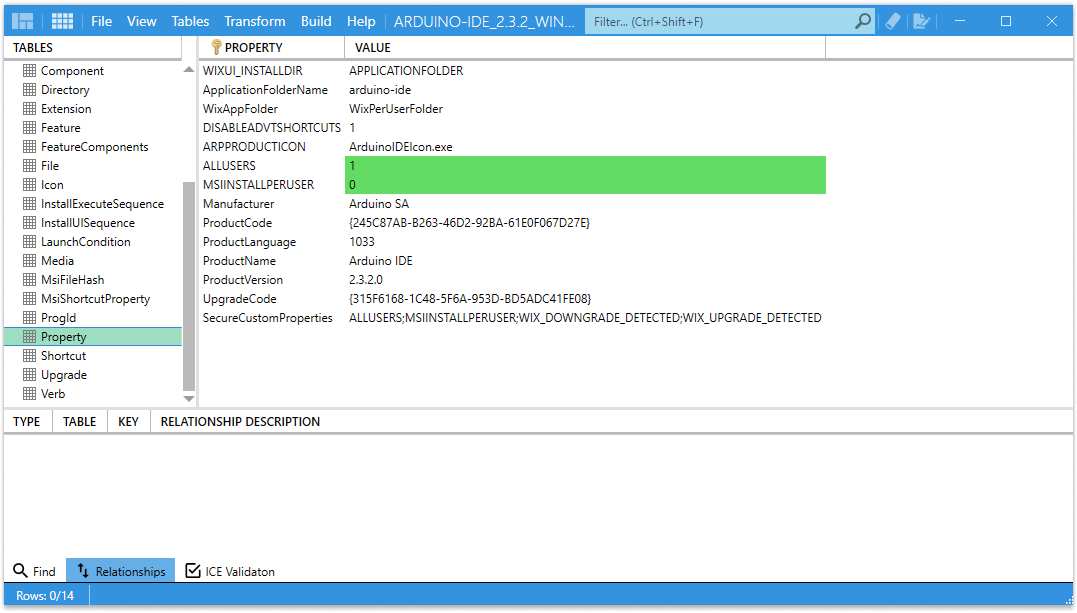
Set MSI to install from per-user to per-machine location
On the left upper corner click on table icon to open Table Editor and locate Property table.
Then change ALLUSERS = 2 to 1 and MSIINSTALLPERUSER = 1 to 0. This will configure that installation will happen under [ProgramFiles] folder for all users.
Improve MSI reliability
Add a decade proven MSI properties that will improve MSI installation reliability.
Read about MSI reliability properties and how to apply them automatically for every package here: Improve MSI reliability with these MSI properties
Install drivers and include the libraries
To install drivers, it is usually required to have:
- Imported driver certificates
- Dpinst.exe that will be used to silently install drivers
- INF driver files
Locate drivers and registries for importing driver certificates
-
Install Arduino original MSI on a clean virtual machine but do not open the Arduino app itself.
-
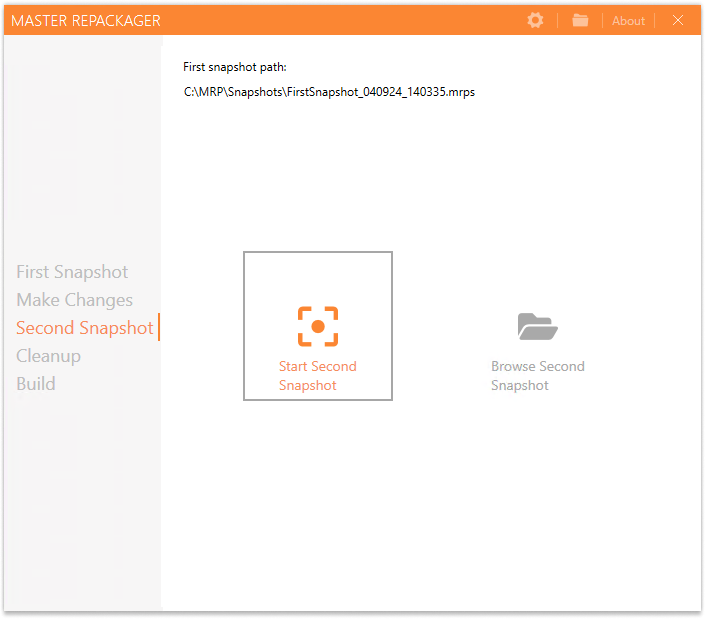
Open Master Repackager and create first snapshot.
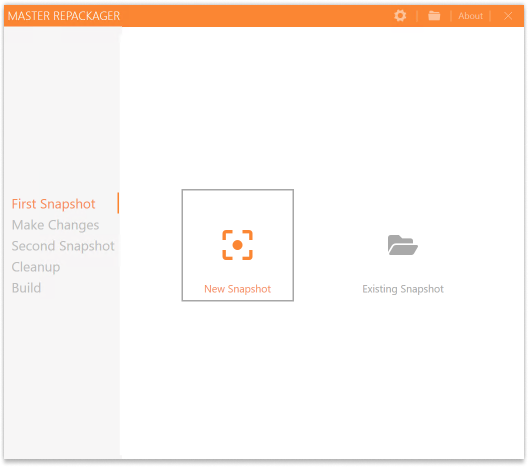
-
Now open Arduino application.
-
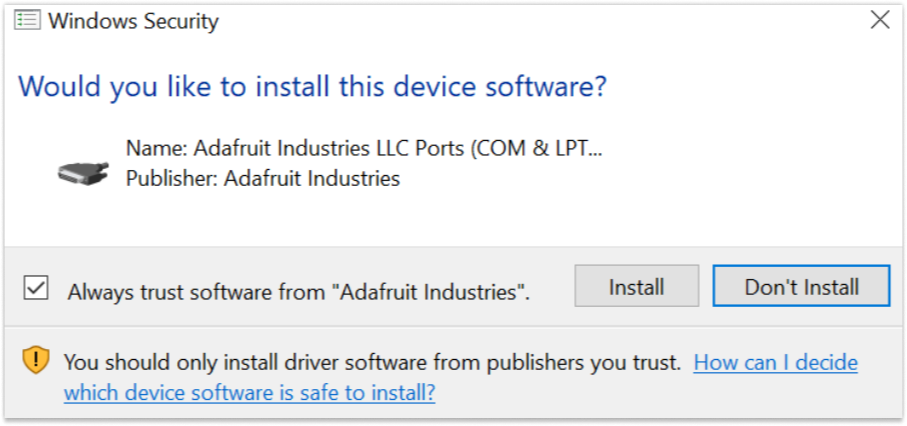
Install drivers and tick the checkbox to always trust publisher.
-
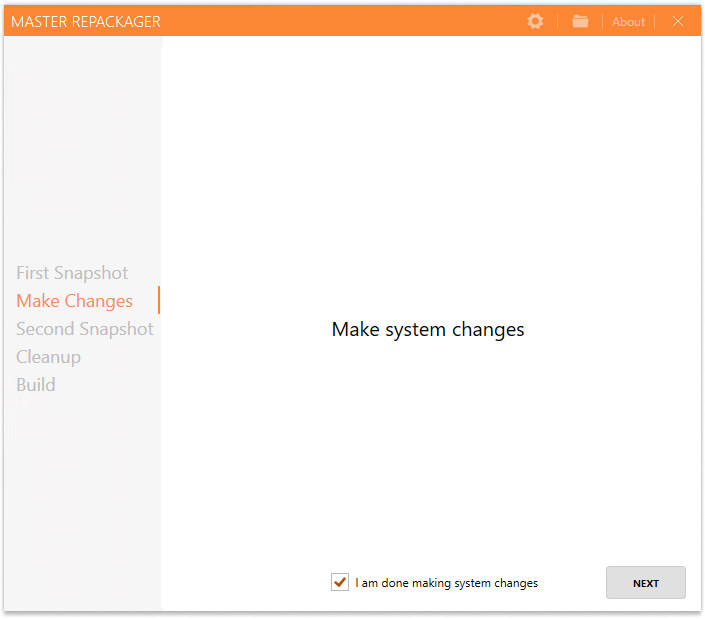
After all drivers are installed, in Master Repackager check the “I am done making system changes” and create a second snapshot.
-
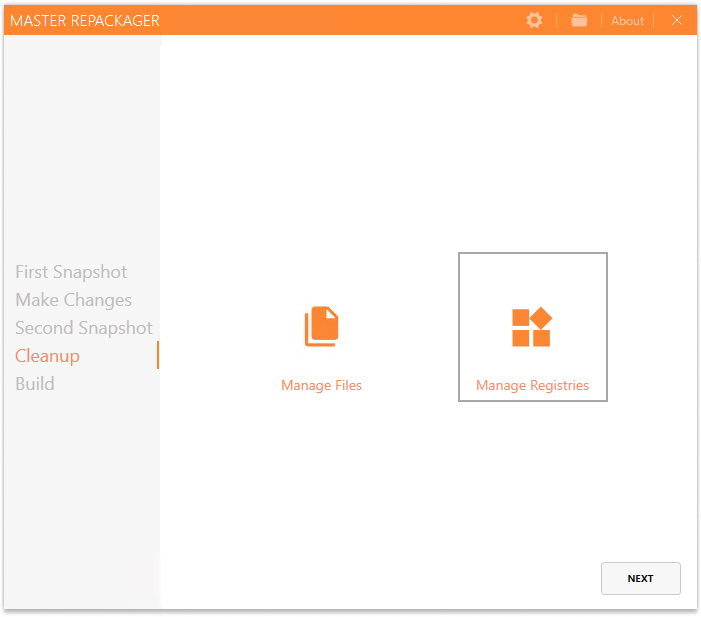
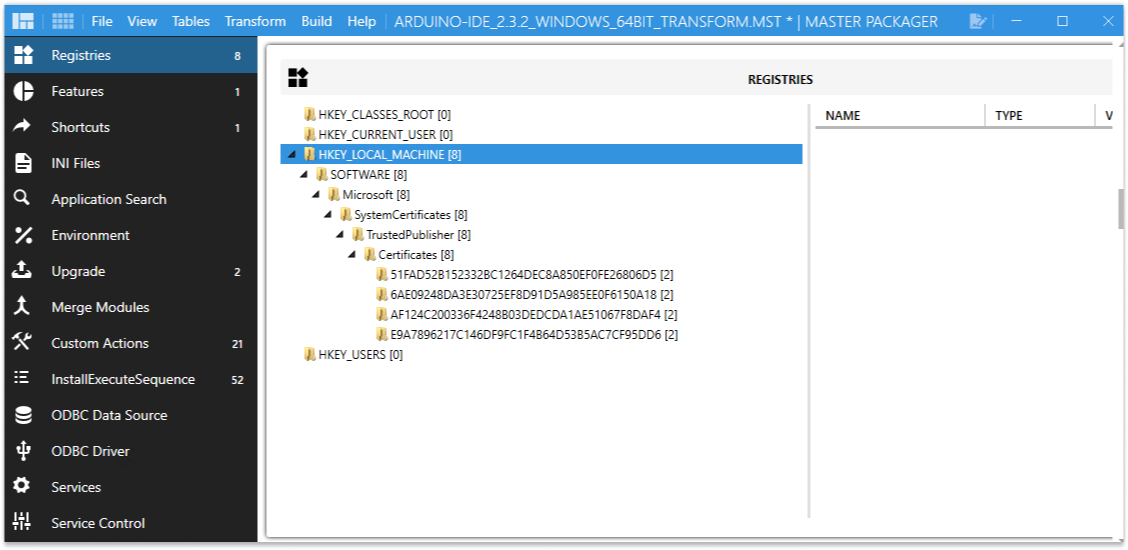
In package cleanup phase click on “Manage Registries” and find registries under Trusted publishers.
- Open them in RegEdit by right-click on the key name
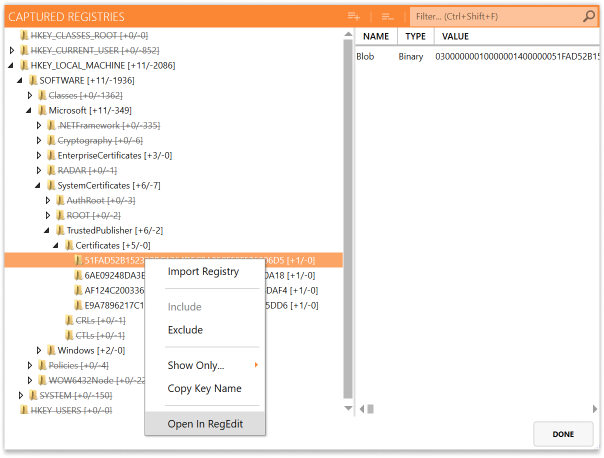
- Export all 4 registry key names under TrustedPublisher\Certificates.
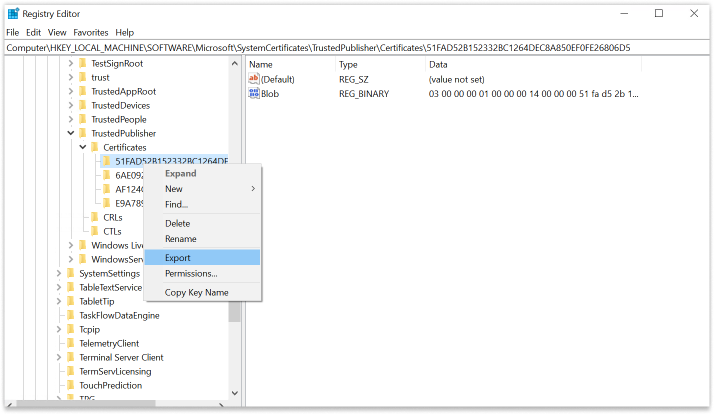
- Open them in RegEdit by right-click on the key name
-
Locate dpinst-amd64.exe file and right click on it and go to file location. Make a copy of the file as it will be required later. Tip: You can use filter search on top right corner to find any file or registry faster.
-
To find the installed drivers you will need to check the "C:\Windows\System32\DriverStore\FileRepository” folder.
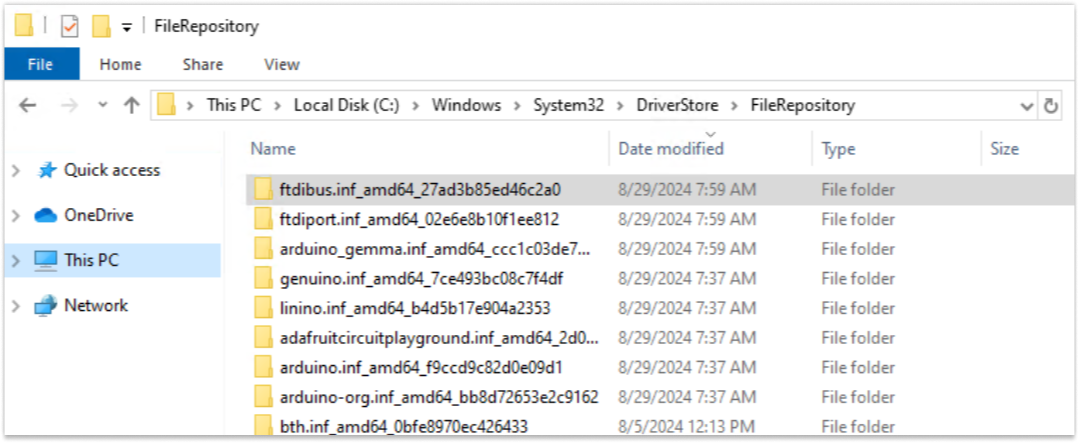
-
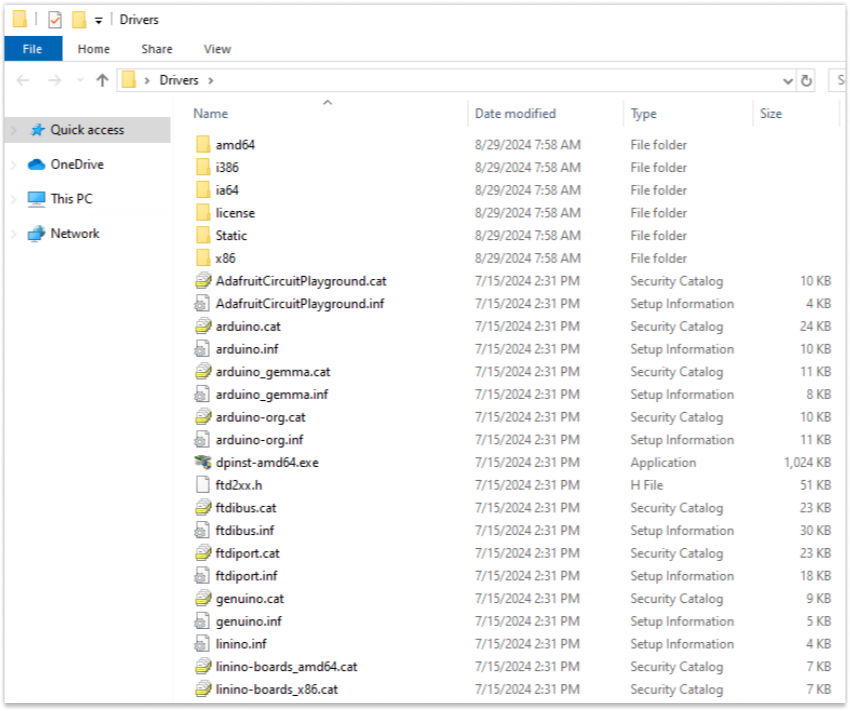
Sort the folder by date modified and you should see 8 subfolders with inf in the name. Create a new folder called Drivers. Then go into each of the driver subfolders and copy its contents to the newly created Drivers folder. Copy dpinst-amd64.exe also in the Drivers folder. Your folder should look like this:
-
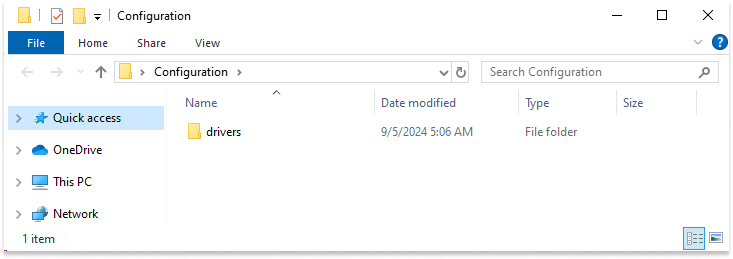
Create a new folder called Configuration and copy the Drivers folder inside it.
Include downloaded libraries
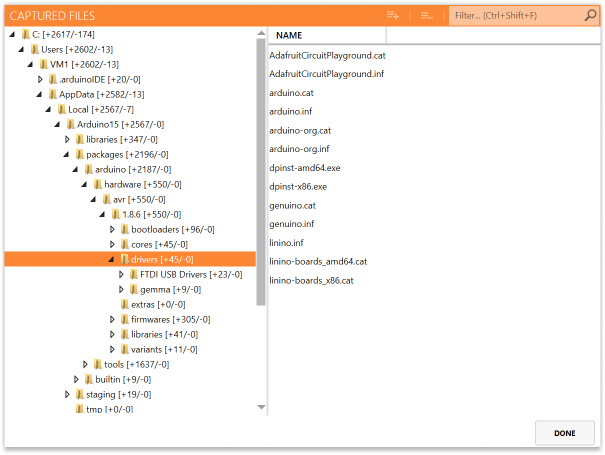
- The libraries must be present or Arduino will try to install the drivers again even if they are already installed. In the captured files of Master Repackager we can see that the application wrote to 4 per user locations:
- “%AppData%\arduino-ide”
- “%AppData%\Arduino IDE”
- “%LocalAppData%\arduino15”
- “%UserProfile%.arduinoIDE”
How can we know which files should be included in the package?
An easy way to do is to use elimination method. Rename one of the folders by adding “_backup” at the end of the folder name, then launch the app and check if the libraries are not downloaded again. Repeat this until the libraries start to install again when launching the app. This means that you have found which folder is required for the libraries to not install again. Using this method you can quickly find that only the “%LocalAppData%\arduino15” folder is required for the libraries to be installed.
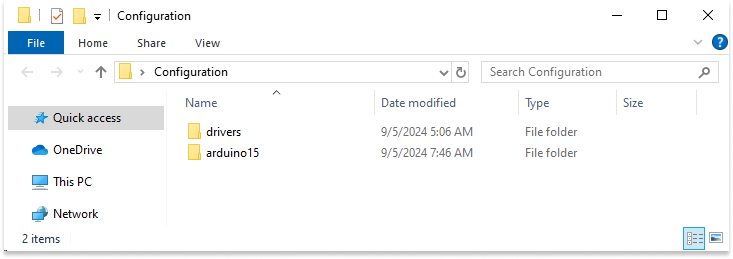
- The last step is to copy the “%LocalAppData%\arduino15” folder inside the Configuration folder that we created previously.
Install drivers with MSI/MST
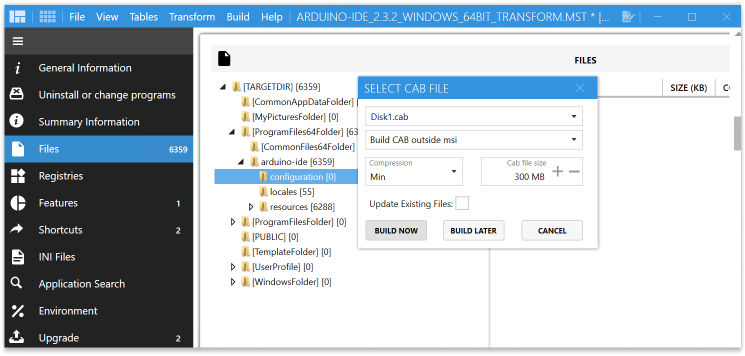
In the Master Packager Advanced Editor find Files section and right click the directory [ProgramFiles]\arduino-ide and select “Add Directory(s)” and browse for the Configuration folder and then press build now.
We will need to use predefined actions that will copy these files from the MSI to each user’s profile during system account installation that is used by most deployment systems.
To copy data to user profile we have created a predefined custom action called: “Copy to UserProfile”. It works amazingly. It copies files during system context installation to all user profiles. It also copies files to default profile so new user profiles can have the same configuration.
Under Custom Actions section, create a new Predefined action “Copy to UserProfile”. It will copy files to %localappdata% folder during the installation process.
Custom Actions → Edit → Predefined Actions → Add new Predefined Action → Copy to UserProfile
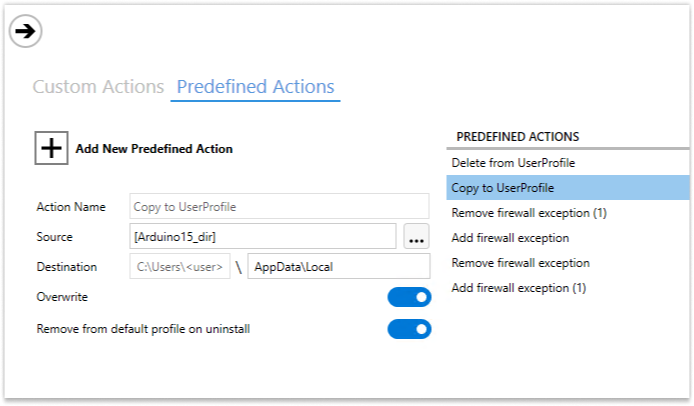
As source select arduino15 folder which was added under the configuration folder. As destination path set “AppData\Local”.
A custom action will also be added to remove these files from the default user profile during uninstallation.
Adding certificate registries
For drivers to be installed silently we need to have the certificates imported to the Trusted Publishers store before driver installation.
In Advanced Editor locate Registries section → drag and drop previously exported registries.
Creating Custom action to install drivers
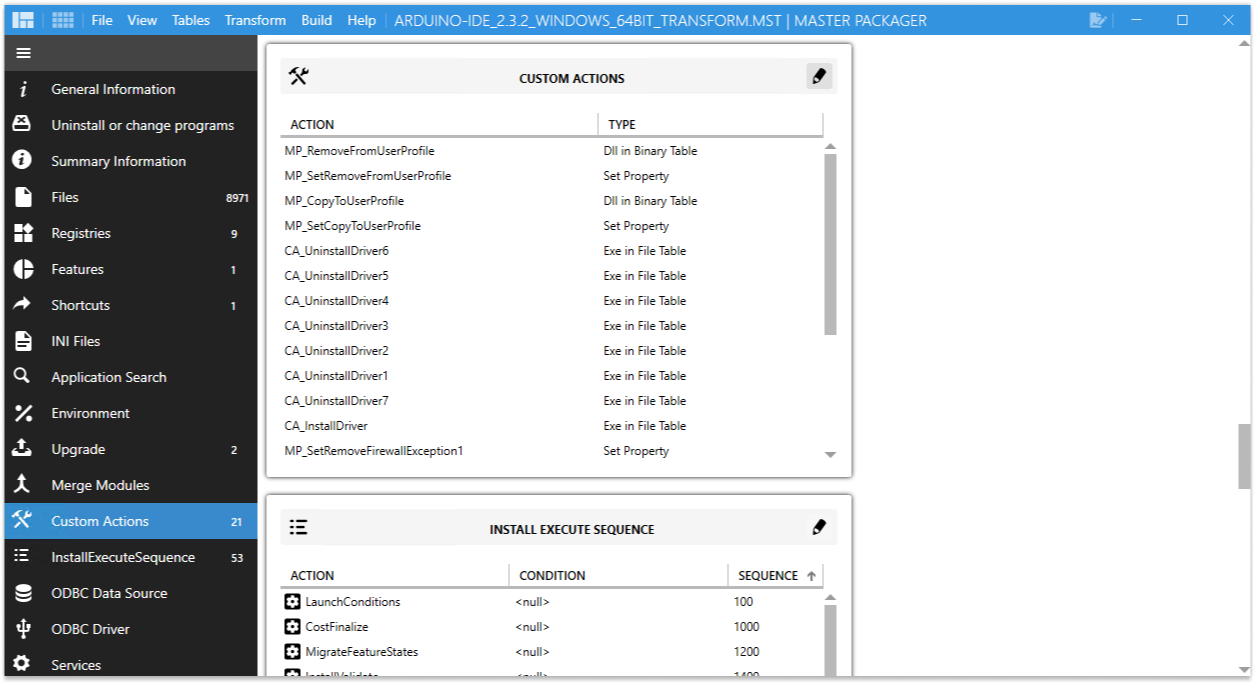
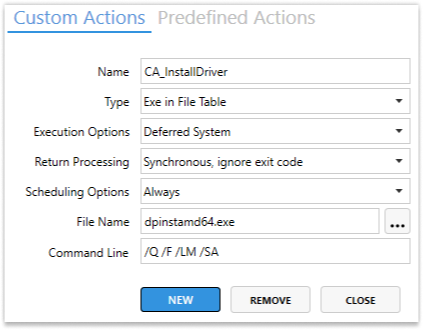
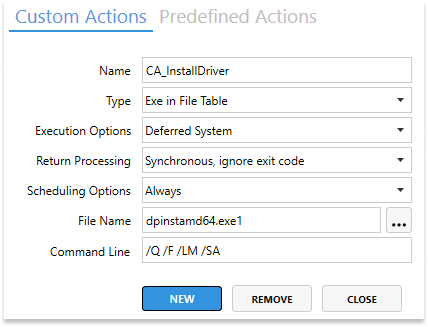
- Under Custom Actions → Edit → Custom actions Create new Custom action create new custom action called CA_Install_Drivers.
- Choose type Exe in File table
- As Execution Options select Deferred System
- Return Processing – Synchronous, ignore exit code – this will indicate that at installation process it would ignore exit code
- Scheduling Options set for Always
- Select dpinst-amd64.exe that we added previously – dpinstamd64.exe
- In command line section add this line: /Q /F /LM /SA
Custom Action should look like this:
After we need to add uninstall Custom Actions for each driver:
- Create a new Custom Action called CA_Uninstall_Driver
- Choose type Exe in File table
- As Execution Options select Deferred System
- Return Processing – Synchronous, ignore exit code
- Scheduling Options set for Always
- Select dpinst-amd64.exe file in the Drivers folder
- In command line section add this line: /u “[#AdafruitCircutPlayground.inf]” /d /q
To create Uninstall Custom Actions faster for each driver, open Table editor.

Copy CA_Uninstall_Driver row and paste (Ctrl+Shift+C and Ctrl+Shift+C to copy whole row) new Custom actions as many as drivers we have and change the file key in the Target column for each corresponding INF file key.
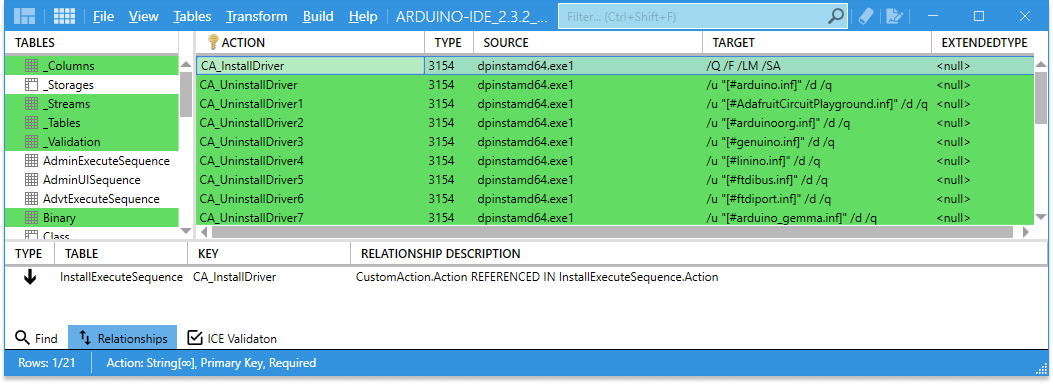
To find file keys go to File table and click on sequence in descending order to see last added files. Or you can use filter in the top corner and type “.inf” to filter out all INF files.
Add created Driver Custom Actions in InstallExecuteSequence
To run each created Custom Action in correct timing we need to add them in InstallExecuteSeqeuence table.
In advanced editor locate InstallExecuteSequence → Edit
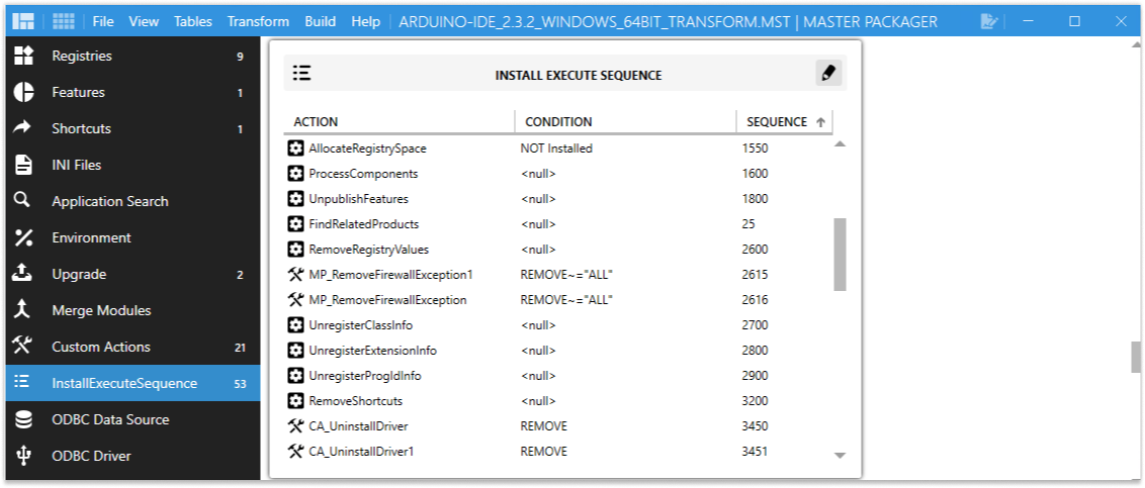
First add CA_Install_Drivers:
- Select Action Type - Custom Actions
- Select Action Name – CA_Install_Drivers
- Add Condition – During Installation
- Set Sequence number – 6500
- Add it to the Install Execute Sequence list
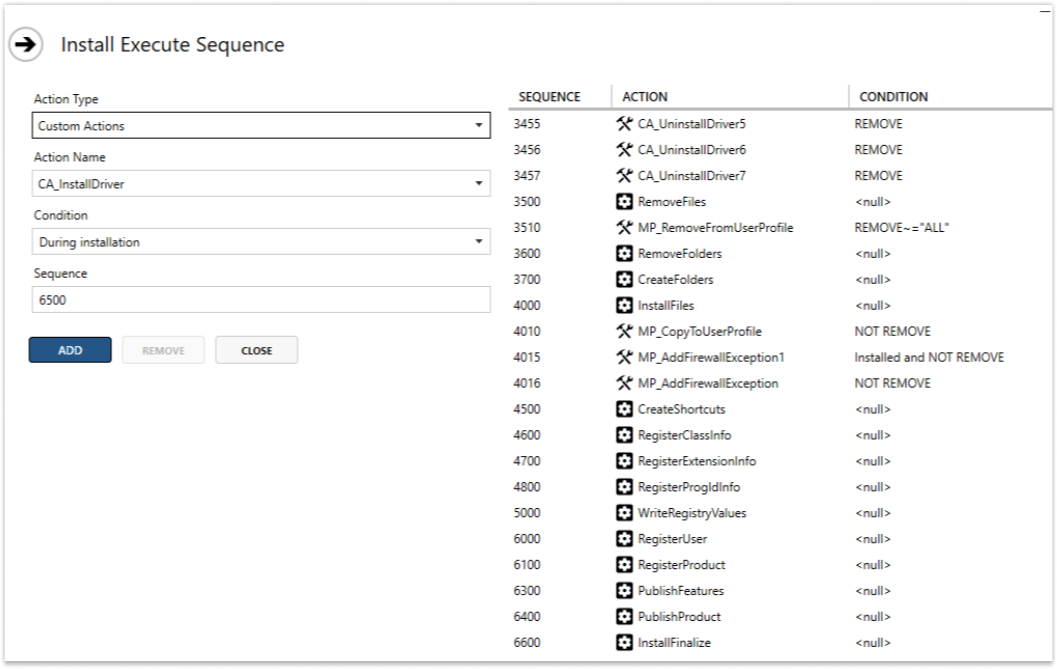
Then add each CA_Uninstall_Driver:
- Select Action Type - Custom Actions
- Select Action Name – CA_Uninstall_Driver
- Add Condition – During Installation
- Set Sequence number – 3450 (+1 for each uninstall custom action. The sequence number should not be the same for any other action)
- Add it to the Install Execute Sequence list
- Repeat it to for each uninstall custom action

Note! It’s important where each type of Custom Action is placed in the Install Execute Sequence list - CA_Install_Drivers should be place after WriteRegistries (otherwise the drivers will try to install before the certificates are installed) and CA_Uninstall_Driver before RemoveFiles action. Also, they should be placed before InstallFinalize Action.
Pro tip! This was a lot of work to install drivers. We don’t like a lot of work like that. After some time, it is hard to remember how to do it again or can introduce typo mistakes. Therefore you can create a template for driver installation using Master Packager Templates feature. Read more about how to do it here.
Firewall exceptions
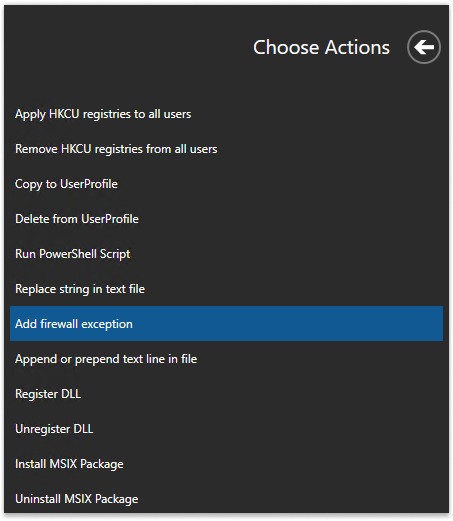
To create a firewall exception, add a new Predefined Action.
-
Open Control Panel → System and Security → Windows Defender Firewall and locate Advanced Settings
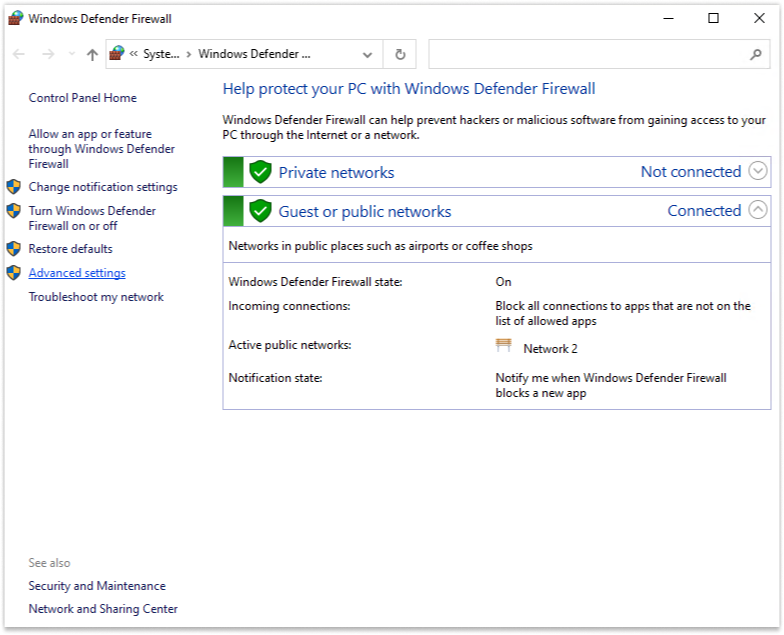
-
Under Inbound Rules is shown information about both needed Firewall Exceptions –for arduino ide.exe and mdns – discovery.exe

Arduino ide.exe firewall exception
Under Custom Actions add new Predefined Action:
- Select “Add Firewall Exception”
-
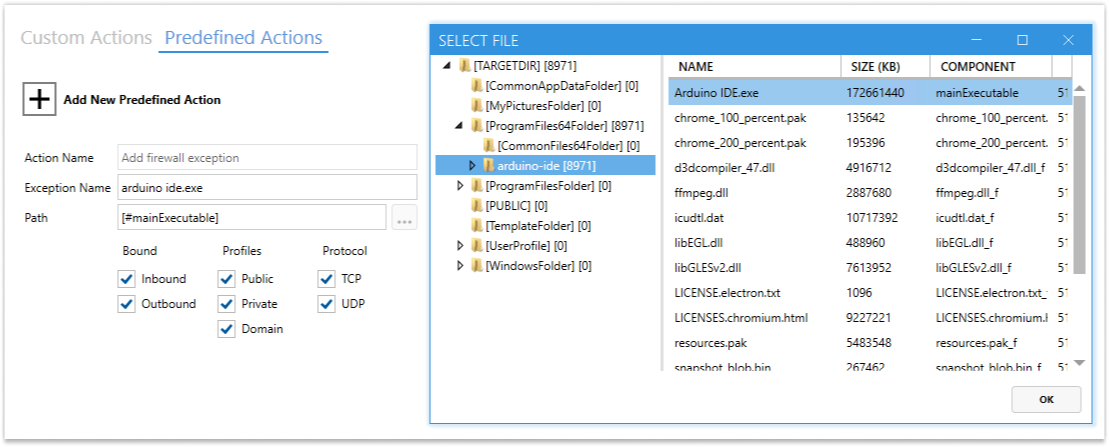
Set Exception name exact the same as it was by default - arduino ide.exe
-
Under Path select the exe file
-
Leave Bound, Profiles and Protocol with their default values
-
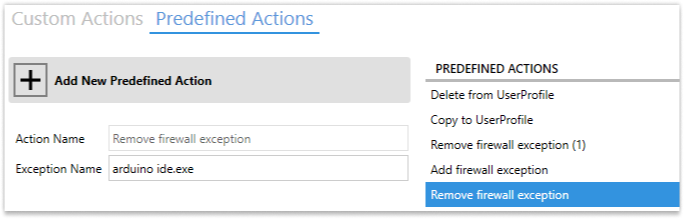
Set the same Exception Name also to Remove firewall exception.
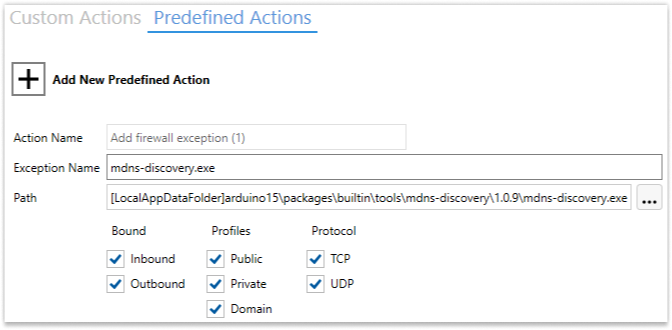
Mdns-discovery firewall exception
Create a second firewall exception for mdns-discovery using Predefined Actions.
-
Select “Add Firewall Exception”
-
Set Exception name exact the same as it was by default - mdns-discovery.exe
-
Under Path set location same as default to LocalAppData Folder:
- [LocalAppDataFolder]arduino15\packages\builtin\tools\mdns-discovery\1.0.9\mdns-discovery.exe
-
Leave Bound, Profiles and Protocol with their default values.
-
Set the same Exception Name also to Remove firewall exception (1).
For this firewall exception to work, we need to set up few more things:
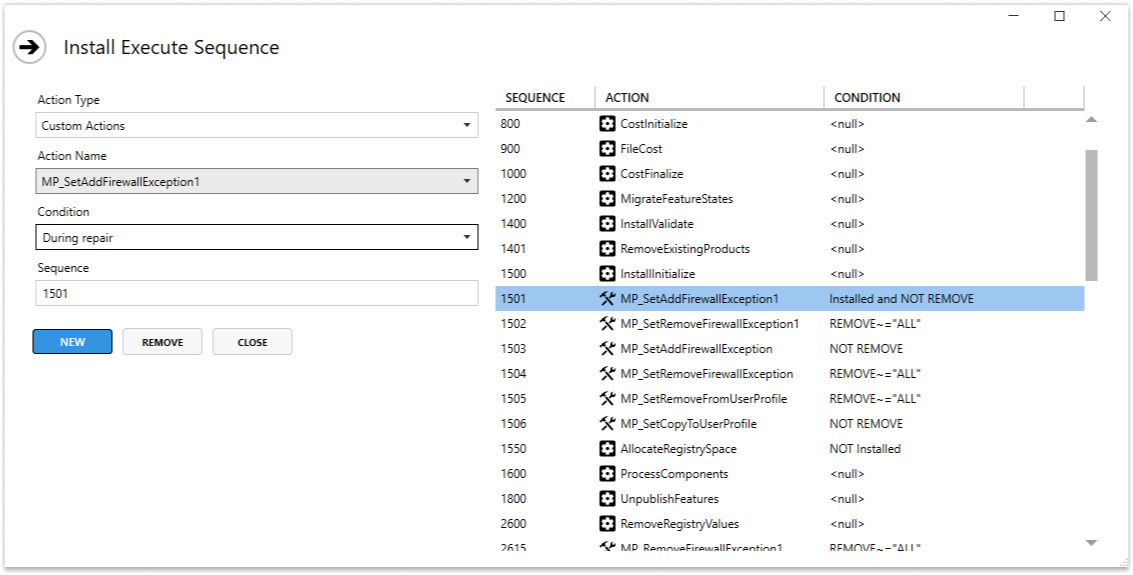
- Change install execute sequence condition to during repair for AddFirewallException and SetFirewallException
- Ensure that the MSI has an advertised shortcut, to trigger self-repair mechanism
-Check for DISABLEADVERTISESHORTCUTS entry in property table. If it exists, remove it to enable advertised shortcuts. - To activate the self-repair mechanism, create a new registry entry under HKEY_CURRENT_USER\Software
Change custom action condition to only be executed during repair for MP_AddFirewallException1 and MP_SetAddFirewallException1
Because Mdns-discovery exe is in user data and system account installation cannot see that location for all users, we need apply this exception during repair.
- In Advanced Editor go to Install Execute Sequence → Edit
- Locate MP_AddFirewallException1 that we created for mdns-discovery
- Change Condition to During repair
- Do the same for MP_SetAddFirewallException1
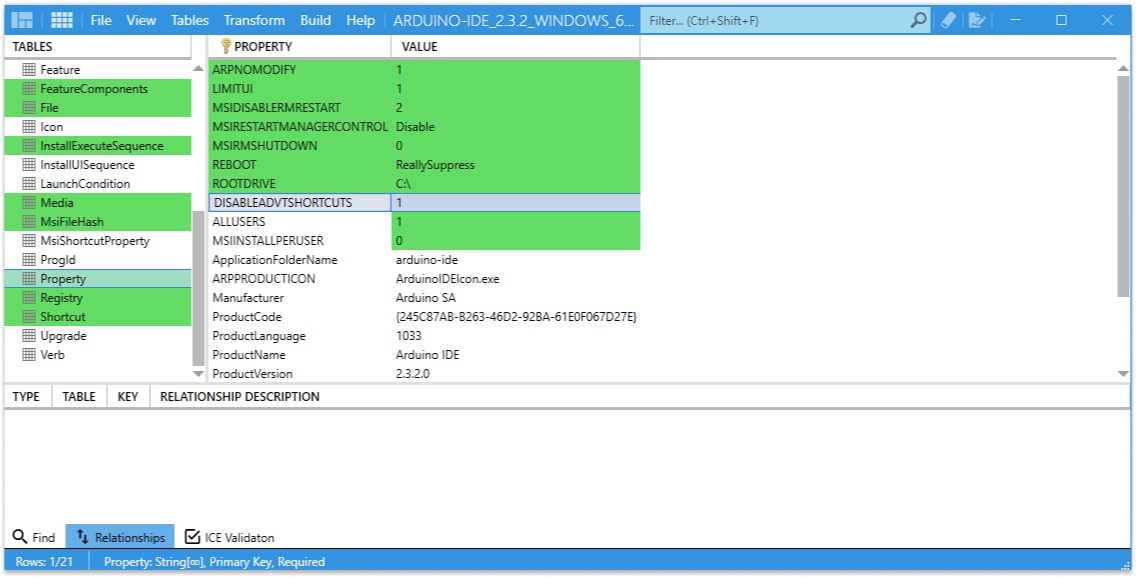
Remove DISABLEADVERTISESHORTCUTS entry from property table
- In table editor locate property table
- Select DISABLEADVERTISESHORTCUTS entry
- Right click on it and delete it
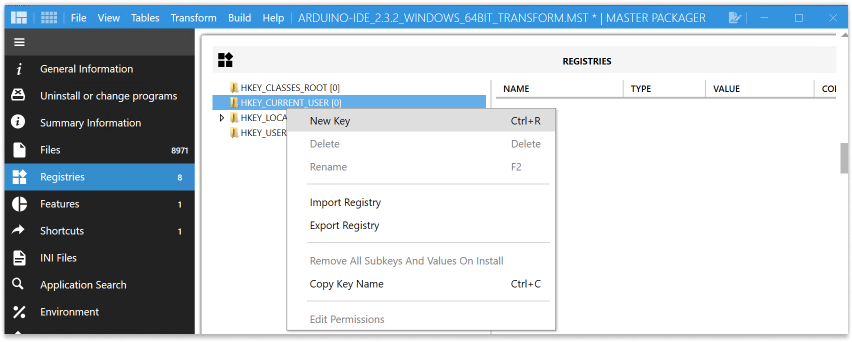
Create a new registry entry under HKEY_CURRENT_USER\Software
-
Under Register section in Advanced editor in HKEY_CURRENT_USER create a new HKCU registry Software[ProductName]. It will automatically create a corresponding component.
-
Open newly added registry in Table editor
-
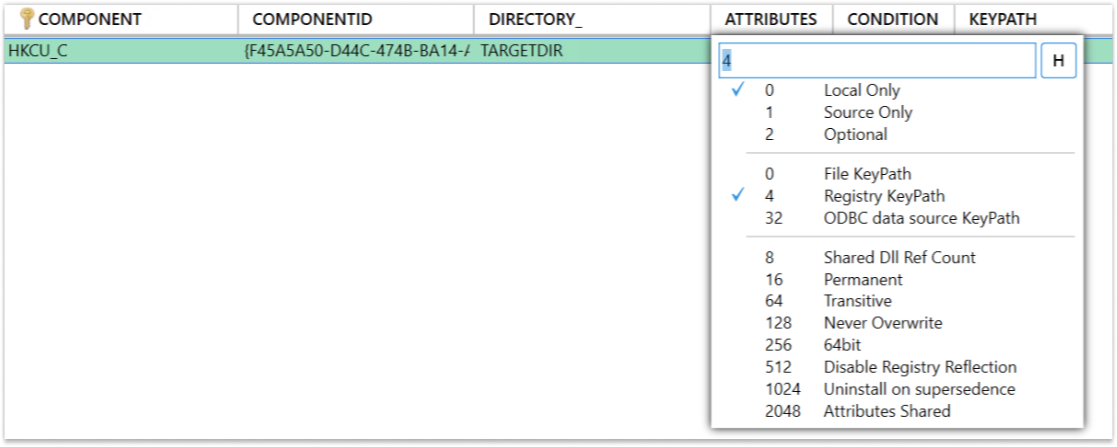
Locate the corresponding component in Relationships → and double click on it
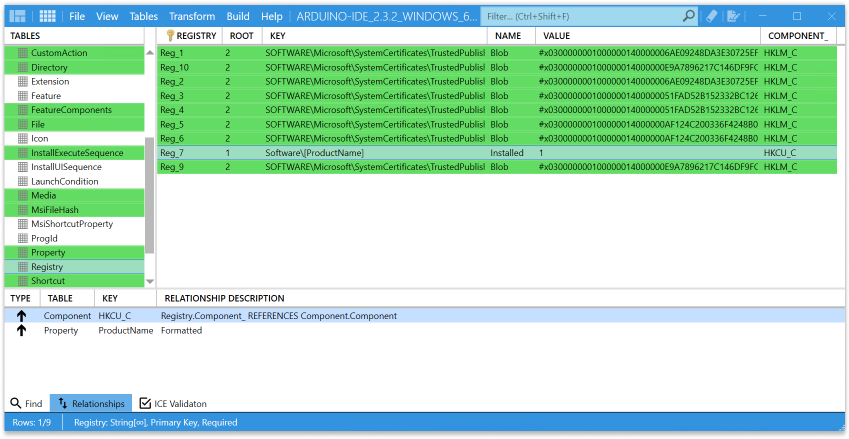
-
Set keypath to newly created registry key (in this case Reg_7 – Software[ProductName]) and set the Component Attributes to Registry KeyPath. This will enable Advertised Shortcut to activate MSI self-heal and register Firewall via Custom Action as in this situation Custom Action will be able to see user data path.

Wrapping
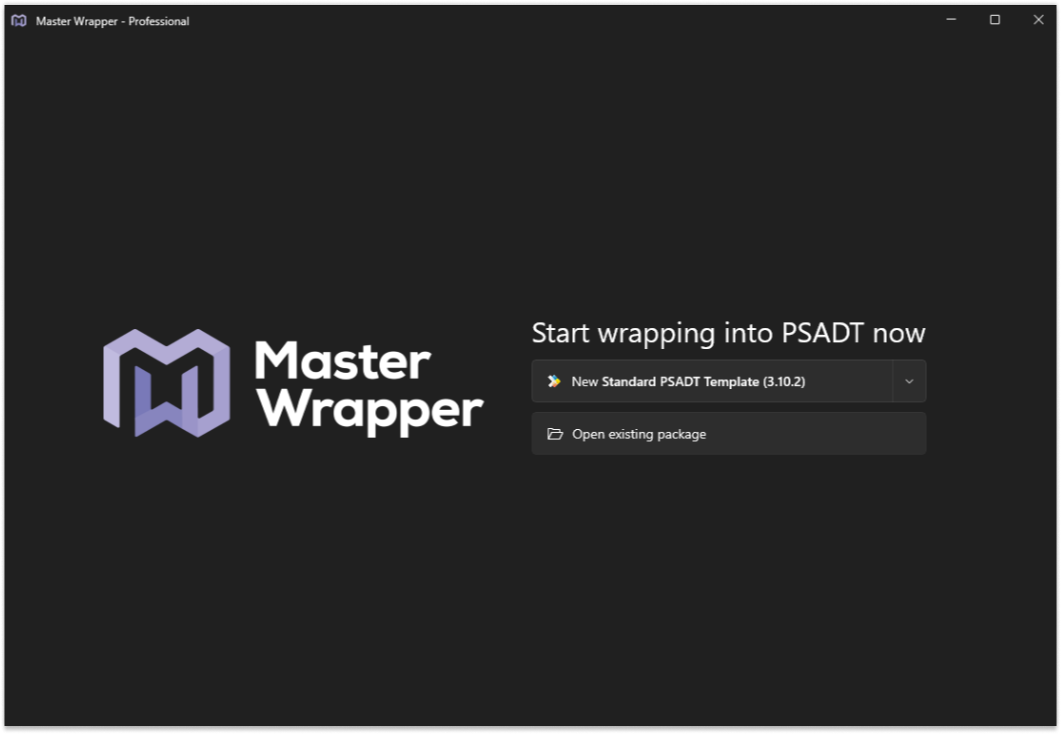
After all the changes in the MST are done, it’s time to wrap this package into PSADT. Master Wrapper is the fastest and safest way to create a PSAppDeployToolkit (PSADT) wrappers.
-
Open Master Wrapper and create a new Project
-
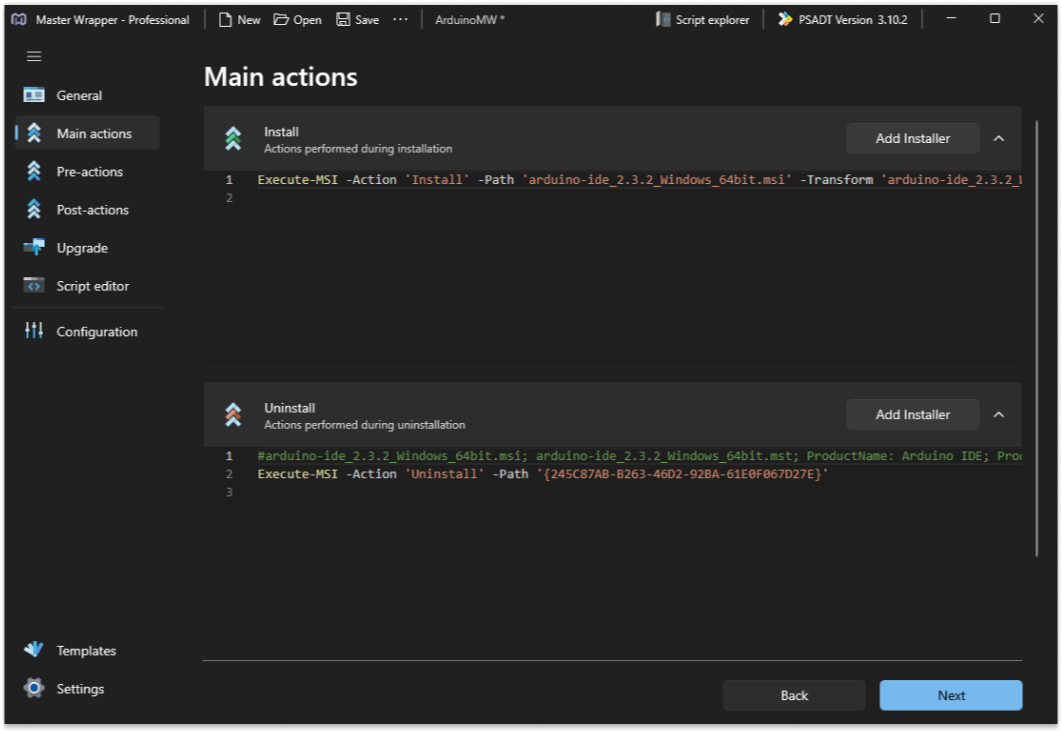
Change General information about application by loading data from the MST or just dragging and dropping the MST file into the Master Wrapper.
-
In the Main actions, Master Wrapper auto-generates Install, Uninstall and Repair command lines
-
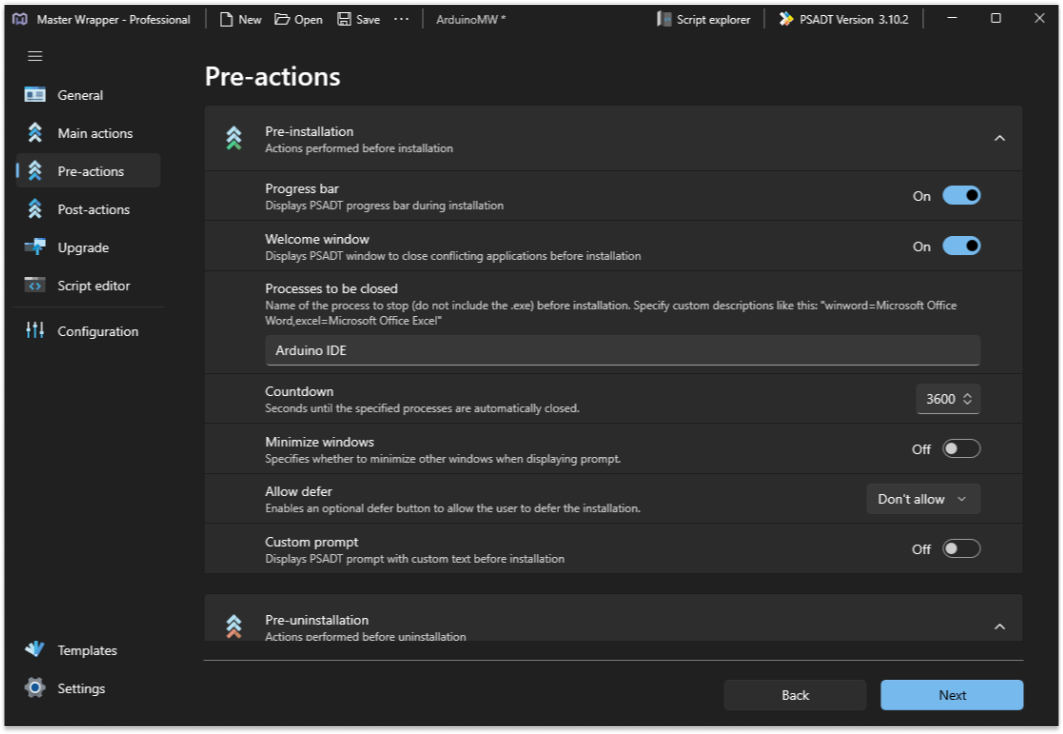
In Pre-actions section set all the information you want to show at installation. If you use MSI/MST then it also finds and sets all the processes to be closed for upgrade. In our case if Arduino IDE is open on user end it will ask to close the application using PSADT functionality.
-
At post-installation you can set request to restart if needed, set force restart after a certain period or you can show custom message that you want show to the user.
-
Next step – at the script editor we need to add two lines:
- Copy-ContentToCache function:
Copy-ContentToCache
- Remove-File function:
Remove-File -Path “$configToolkitCachePath$installName” -Recurse -ContinueOnError $true

- Copy-ContentToCache function:
Copy-ContentToCache function copies the toolkit files to a local cache folder. It’s necessary for the repair to work because Intune deletes the installation folder after the installation is complete.
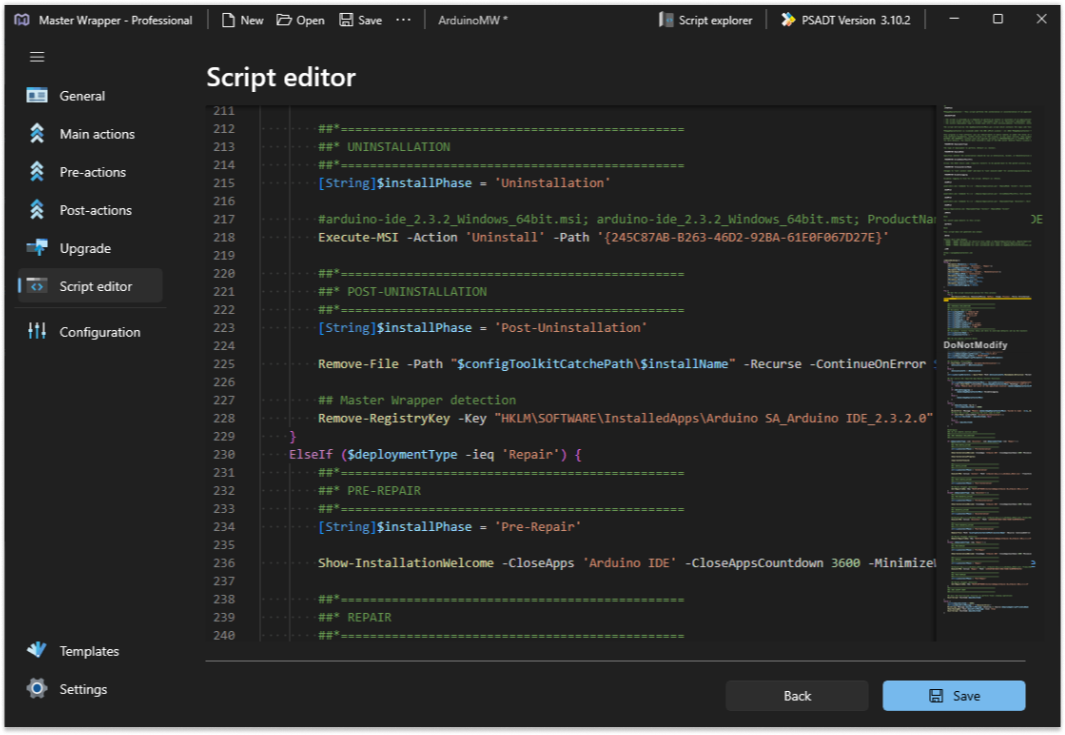
Remove-File function will ensure that the cached folder is removed during uninstallation.
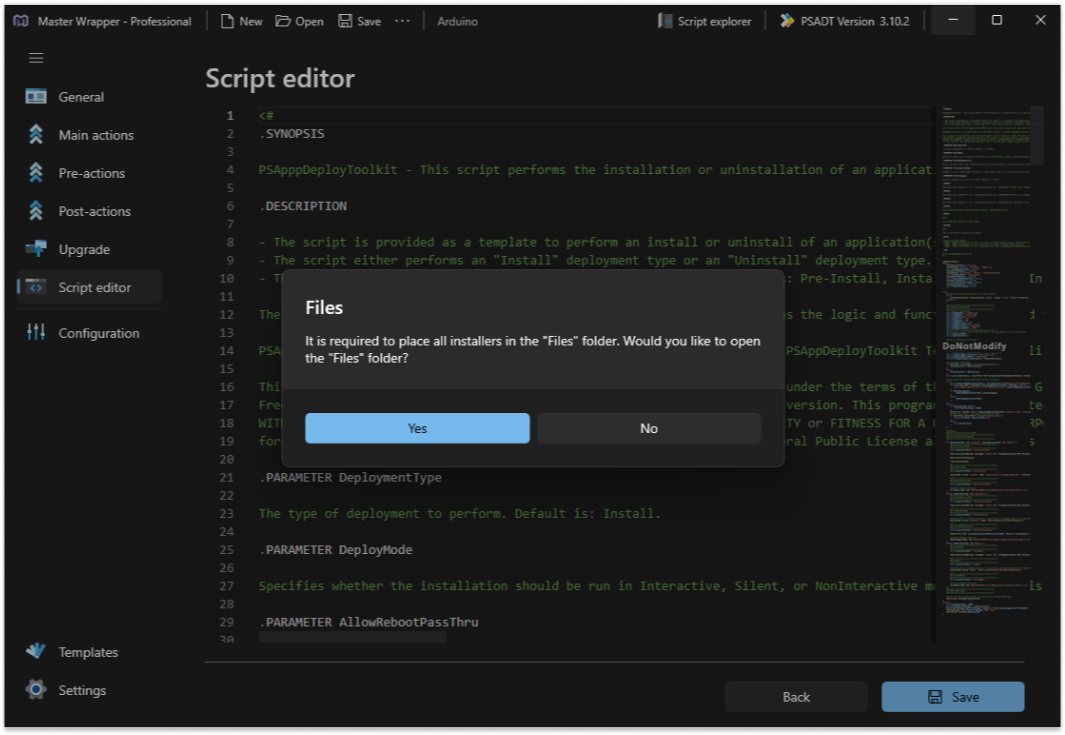
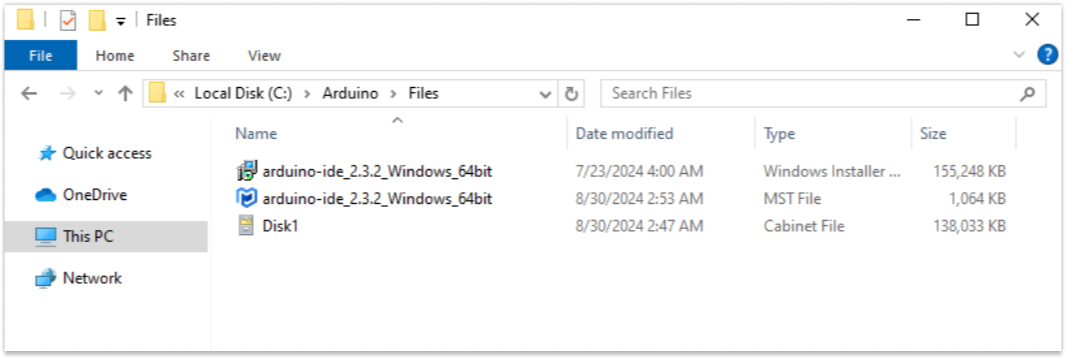
- Save the package
- After saving, Master wrapper will suggest opening the Files folder in newly created package. Drag and Drop created MSI, MST and cab file into it.
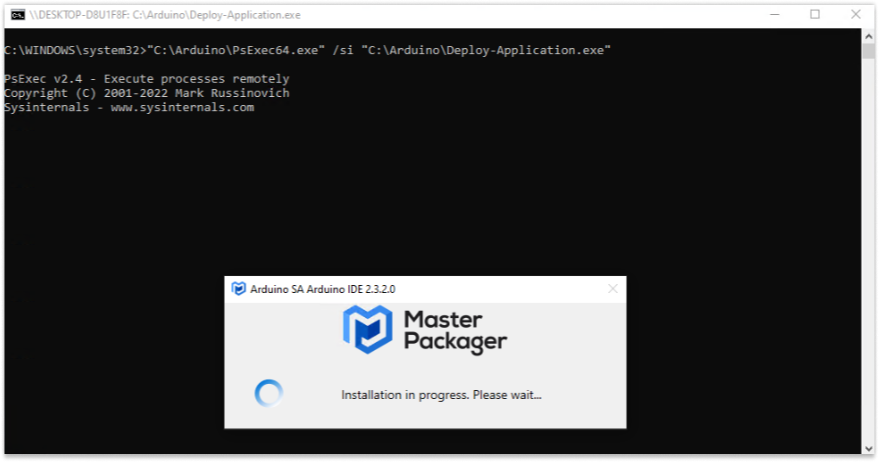
Testing installation
To test if the application is packaged and wrapped correctly you need to do installation through system account. To do this, you need to use PsExec.
- Open CMD as administrator
- Add the command line and run the installation:
<path to PsExec>” /si “<path to Deploy-Application.exe>
Conclusion
Arduino IDE 2.3.2 is not suitable for deployment in enterprise environments. This means that you need special skills to package it. Fortunately, we’re here to help you become a Master Packager. For Master Packager Pro customers this is not a problem as:
- They have Master Packager Pro software to handle any app
- Discord community to ask for help
Self-paced courses are coming soon so you can package with confidence on your own. Subscribe to our newsletter to learn when they are available.
Have an easy package!
The Master Packager Team